
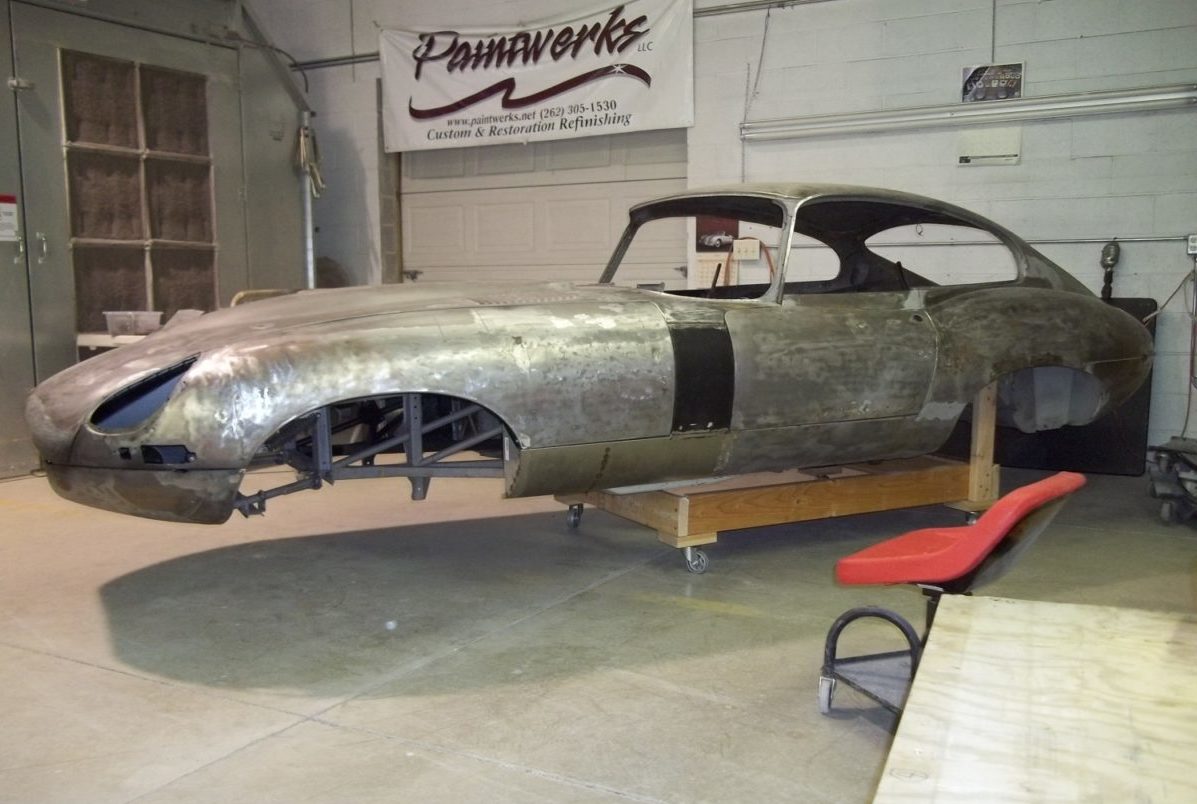
This car was delivered to me in pieces. The bonnet alone is at least 13 different pieces. The first thing to do was assemble the body. Shim the bonnet hinges to get a good fit and mount the catches on each side to insure I have good pieces to work with. What followed is shown in the following pictures. When the owner gets this car assembled I will have pictures to show the completed project. The pictures do not capture the beautiful British Racing Green color.
(Click on any image below to view larger size.)

-

- Looking in on the drivers side there is a bit of repair needed.

-
- After dimensions are taken, the piece going across is removed.

-
- The new section is fit in place.

-
- The side area here needs to be replaced before the floor section can be put in.

-
- After cutting the bad section out, the replacement piece can go in.

-
- Many repairs are common to both sides.

-
- The new floor section can now go in.

-
- With the floor done, the far wall of the foot well can go in to close the interior back up.

-
- This is a brace on the inside of the bonnet. It is one of only a few that was still glued in place. In had to be removed to repair the outer skin.

-
- This picture is showing how beat up the panel was to begin with.

-
- This is the back end of the bonnet where it meets the body. I can only guess that the curve indicates how much filler had been used at one time. This was all hammered flat to match the body contours properly.

-
- This is the lower part of the nose that creates the front opening. Extensive repair was needed just to assemble the bonnet for initial fitting.

-
- Here the bonnet is being put together. It is about 13 pieces that makes up the bonnet. Once it is in the final stage of fitting, it is never taken apart again.

-
- This is the part that forms the lower part of the front opening.

-
- After some diligent hammer and dollie work, it is looking pretty good.

-
- This is typical of the old school repair work that I commonly run into. This section is part of the headlight opening.

-
- Here the section is repaired and assembled.

-
- This is on the body where the “A” pillar comes down. The gold color is more evidence of a previously brazed repair.

-
- Here the area is being sectioned in.

-
- Here a new door skin is going to be installed.

-
- The entire rocker panel has been removed.

-
- The structure inside is repaired before the new rocker goes on.

-
- With the new rocker panel and door skin in place, the body begins to take shape.

-
- Countless measurements and checks are done as the process continues.

-
- Another rough spot is cut out.

-
- A panel is fabricated and installed.


-
- The complete body is test fit and adjusted.

-
- Due to the size of the bonnet, a special cart was made to keep it easily mobile.

-
- Epoxy and high build primer is next.

-
- Here the guide coat is applied to aid in block sanding.

-
- The body is put back on the rotisserie to provide easy access to the whole body.

-
- The block sanding process. It is coming out beautiful.

-
- The body was sent out for chemical stripping and e-coating. This is what it looks like inside and out.

-
- The bottom is scuffed for paint.

-
- The wheel wells are undercoated and then the bottom is painted in body color. The bottom is then masked off to protect it from over spray as the topside is painted.

-
- The assembled bonnet gets painted on the inside right before the outside is done. There is no way to do it all at once.

-
- The inside must now be masked off completely to protect it from over spray. It is a very detailed task.

-
- The body is done with the front frame mounted waiting to be picked up.

-
- Pictures don’t do it justice.


-
- The door is fixtured for reassembly at the shop doing all of the assembly work.

-
- The bonnet is ready to be installed.


-
- Excellent detailing.

-
- The interior is turning out perfect.


1973 911S Targa
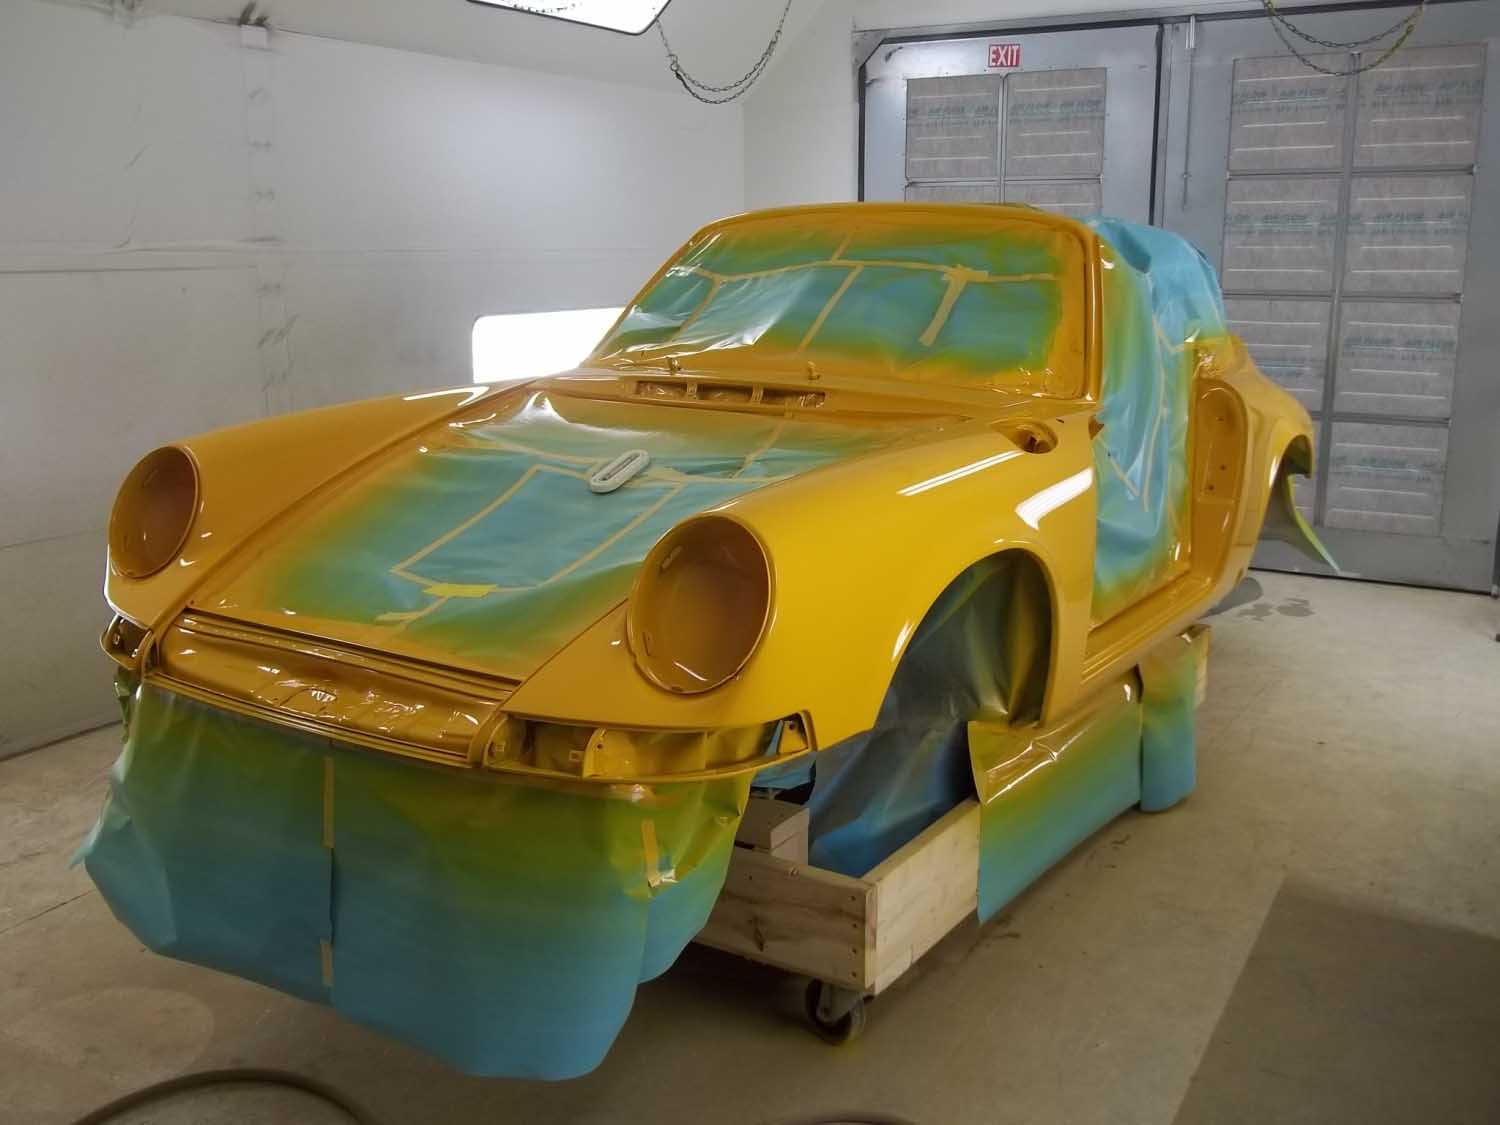
This is an original car with minimal rust issues and almost all original paint. The paint will be matched to this cars original Signal Yellow color. It is great to work on an unmolested car. I will be trying to keep as much of an original look as possible. They were not sprayed with a complete and uniform coat of paint as noted in one picture of the trunk.
(Click on any image below to view larger size.)
-
- This car arrived almost completely disassembled. The owner is restoring every component before it goes back on.

-
- There are small body line issues on this car.

-
- Here is a typical rust area on targa’s. This is a very quick repair.

-
- This small spot is due to water getting behind the undercoating and sitting. This spot can be seen from inside the wheel well. Rust usually forms where several layers of metal come together.

-
- This is what is believed the original fit of the aluminum engine hood.

-
- With some gentle persuasion, it lines up nicely.

-
- The rust is cut away.

-
- The patch is done in two parts. The top part is first to create the top body line.

-
- The lower section is curved to match the contour of the body.

-
- The antenna hole is the only area were someone altered the body. I used a much thicker piece of steel here to reduce the risk of the metal bending from tightening the antenna too much.

-
- The metal is cut away to gain access to the inner structure.

-
- Another typical rust area is around the jack receiver. Several layers of metal are joined here and are exposed to water thrown off of the rear tire.

-
- First the inner structure is repaired and covered in zinc primer.

-
- Now the outer surface can be repaired. The lead is melted away before repairs are made and a patch is made to fit the remaining metal.

-
- It may be hard to see here but the paint in the trunk is very thin and uneven from the factory. I will need to replicate this as close as possible.

-
- Another typical place for rust. The inner surface is repaired and coated.

-
- There were just small rust holes visible at first. The patch size indicates how far back the rust had affected the metal.

-
- The under body was in extremely good shape. It was extensively cleaned and a fresh coat of Wurth undercoating applied for a uniform appearance.

-
- Gray epoxy primer is applied to the undercoating before the body color is sprayed.

-
- The engine bay had a very even color to it in all of the visible areas. Behind the sound deadening pad was less uniform.

-
- From here, the under body will be masked off as the outer shell is completed.

-
- With the wiring harness bagged and the dash masked off, I am ready to paint the trunk.

-
- Using Wurth undercoating, I spray several coats to build it up and blend with the original undercoating.

-
- Epoxy primer is used to bond the paint to the undercoating.

-
- One coat of single stage paint is used to give it an original look. The camera did not pick up how the paint is thin and uneven just like the factory paint was.

-
- The trunk lid has been blocked and shows the variations that exist in the original body. Only a few mils of paint were needed to straighten the panel out. Three small areas needed a skim of filler to level them out.

-
- Blocking the body brought out the same small deviations in the panels. After masking the underbody, it is ready for primer.

-
- Priming the entire body is needed to fill any sanding scratches and nicks that may have been too hard to detect.

-
- Final blocking with the guide coat will show every scratch and nick to be sure we have a nice straight panel.

-
- This hairline crack was undetectable before priming. This is the rear threshold of the engine compartment. This was the only place I thought the original paint had issues. I feathered it all back until it seemed solid. This is the only spot that will need a little rework. Another benefit of priming first. There are faster ways to get this car in color, but details like this would end up in the finished paint. Quality is in the details.

-
- After the final blocking it is wet sanded and remasked.

-
- After a final cleaning and tacking, the painting begins with the jams and tight areas.

-
- After three coats are applied, it is allowed to dry and tacked again before the clear coat.

-
- Three coats of clear are used to allow enough material for complete color sanding and polishing.

-
- With the body color sanded, it will then dry four weeks before final detail sanding and three step polishing.

1962 356 Notchback
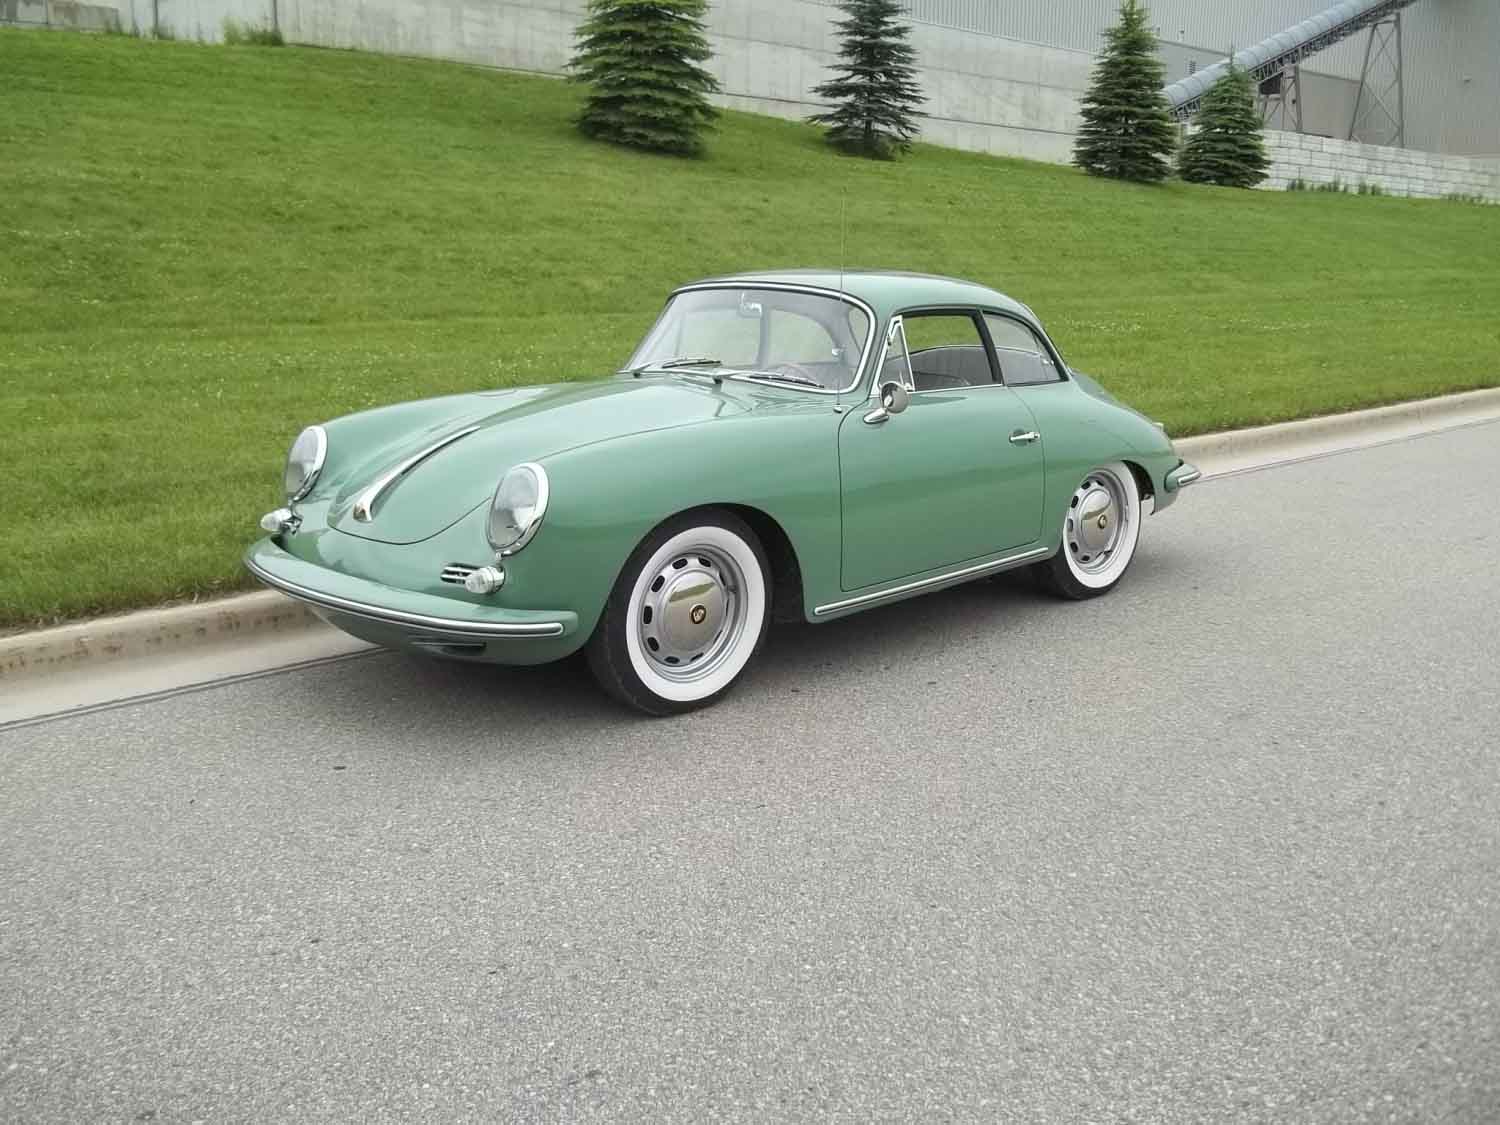
This car had been parted out 30 years ago. Since then, it has been stored in a dry building on a concrete floor. We bought a heavily damaged and rusty car to source all of the running gear. We did a few unique things along the way to make it an easier car to enjoy every day. Every component was restored or rebuilt before in went back on the car.
This is a complete build and it took some time.
(Click on any image below to scroll through larger size images.)
-
- This is the body as it sat for the last thirty years.

-
- To our surprise, in the usual places it was not any worse than we have seen before.

-
- While it does not look worst than the average 356, we will find the truth after chemical stripping.

-
- The nose of the car has no accident damage. That is a surprise.

-
- The back also has no damage.

-
- The fenders are in very good shape as far as accidents are concerned.

-
- The common rust issues.

-
- This is very normal fender rust. No surprise here.

-
- This is a surprise. How this became so heavily damaged is unknown. An NOS cowl has been found and will replace this area completely.

-
- Given the condition of the rest of the body, this damage is a little surprising. It is worse than the picture indicates. A new section will need to be sourced.

-
- Again, very common rust issues on the doors. The rest of the panel is free of dings or waves.

-
- This car will be dipped after the metal work and e-coated. This picture illustrates how effective my metal prep chemicals are in removing surface rust. In just a minute it cleans the metal and exposes a small ding.

-
- This floor was repaired very poorly. It came out very fast. It was not even attached to the center tunnel.

-
- All of the attachment points for the floor are gone.

-
- First the heater tube that runs through the longitudinal will have to be made. It passes through the body and comes out under the rear seat. It is a little blurry but it is easy to see that it is completely rusted away.

-
- After the rotted sections are cut away, it is interesting to see how nice the metal is inside the cavity. There is plenty to weld to.

-
- The heater tube and inner torsion bar area are mocked up.

-
- With the outer torsion bar sheet metal fitting, welding the heater tube and sheet metal can now be done.

-
- The forward section of heater tube is now being made. The extra time to make a perfect fit proves to be easier in the long run.

-
- Notice the small tube coming off of the big one at 45 degrees. That supplies heat at the floor and matches the original tube perfectly. The rusty opening is bent sightly out of the way so it can be used for reference during fabrication. Finishing is still needed on the end of the large supply tube.

-
- Here the inner longitudinal is rebuilt to provide a lip to attach the outer skin and the floor.

-
- Looking straight in from the bottom, this shows the forward bulkhead at the pedal cluster removed.

-
- The bulkhead repair section is now in place.

-
- The original parking brake cable guide is salvaged, straightened and welded in place.

-
- This is the tunnel repair complete with perforations for plug welding the floor in place.

-
- With the tunnel attached to the forward bulkhead, the floor perimeter is ready for the outer longitudinal skins and floor to be fit and installed.

-
- This is the inner wheel well on the passenger side. This old repair will be removed completely.

-
- Another view of the same area. It is completely rusted out.

-
- New sections are fabricated for each piece.

-
- With the longitudinal in place, this section is complete for now.

-
- I have decided to replace the cowl before putting the floor in. It will be easier to reach through to the bottom of the dash if I need to.

-
- After inspecting exactly what is bad and what is good, I am able to just replace the main section of the cowl. All of the surrounding areas are strong and rust free.

-
- With the cowl in place and the trunk lid installed, the body lines look great.

-
- The floor and forward brace installed.

-
- With the old engine tray removed, repair areas and replacement sheet metal go into place.

-
- The engine tray surround fits perfect.

-
- A view from the underside.

-
- This is an example of how all of the previous repairs had been done. Braze a big patch over it after hammering it in. Then cover with vast amounts of filler.

-
- With the patch removed, the structure behind it is fabricated and replaced.

-
- The outer skin is cut and fit. It is then butt welded in place. This repair was the same on the other side as well.

-
- The door bottoms were consistent with the rest of the car. Rusty and needing replacement.

-
- After removing the rusted sections, there was plenty of good steel to work with.

-
- The leading edge is made from a smaller piece to control the quality and size of the radius. It also is needed to cut the larger section to the perfect size for the overall length.

-
- The repair panel is carefully measured and cut to insure the bolt openings in the bottom are in the right location.

-
- The trailing edge is rebuilt with several pieces as needed.

-
- This is the drivers side “C” pillar. I determined it was necessary to replace the entire inner wheel well.

-
- With the wheel well removed, there is nothing holding the quarter panel in place.

-
- Only the bottom and back of the wheel well panel is secured. The lock post panel, rocker/sill assembly and door all were mocked up together to determine exactly where it should all be.

-
- The top surface from the “B” to the “C” pillar is actually two layers. Those had to be made and fit using the other side as the reference for all of the dimensions.

-
- With the lock post panel in place, there are still filler pieces to be made to fill in at the bottom. Repairs to the quarter panel also need attention.

-
- The finished wheel well. The curved rail at the top was fabricated in two pieces to replicate the factory stamped part.

-
- To accommodate the compound curves, the outer skin was done in two pieces.

-
- The beginning of the right side.

-
- The front wheel well closing panel is removed.

-
- The replacement panel in place.

-
- The rocker panel assembly mocked up for fitting both the closing panel and outer fender repair panel.

-
- The fender repair complete and preparing to fit the rocker and sill for the last time.

-
- The rocker and sill in place.

-
- The final fit.

-
- Nice clean body lines.

-
- A few small details and it is off to be E-coated.

-
- The body is finally back from E-coating and the bodywork is done. It is back on the rotisserie for seam sealing and undercoating. It is easier to see and reach every crevice when you can turn it 360 degrees.

-
- The body is completely masked to prevent any undercoating from getting on the exterior.

-
- Several coats are applied to give it that thick factory look.

-
- Another view of the under body.

-
- Removed from the rotisserie, the body goes through final prep.

-
- Epoxy primer goes on first.

-
- Next is the high build primer.

-
- The last thing is the guide coat followed by a few weeks of dry time.

-
- After the first blocking, the body appears very straight. No additional body work is needed.

-
- Prior to the final color going on, the dash is painted. Final masking is done and the exterior is painted.

-
- After color sanding and four weeks of drying time, the paint is buffed in three different compounds.

-
- The body is masked for undercoating of the trunk.

-
- Now the body will be completely unmasked and assembly can begin.

-
- The wiring harness goes in first. It has four separate sections to it.

-
- The fuse box is wired in. The dual master cylinder is installed with the new reservoir. The steering box is also loosely in place to mock up how everything will fit.

-
- It looks like it was always meant to be there.

-
- The trans axle is ready to go in.

-
- It is starting to come together.

-
- With the transmission in place, it will be sitting on its wheels soon.


-
- The steering box, brake reservoir and master cylinder were all installed loosely until the final fit adjustments were made. Everything is now tight and ready to go.

-
- After running the clutch cable, the trans will be ready to go.

-
- An additional view as it comes together.

-
- A layer of Dynamat is used for sound dampening throughout.

-
- The steering column and directional switch go in as the dash wiring process continues.

-
- The sound deadening for the engine bay is almost complete.

-
- It gives the area a nice finished look.

-
- After the glue dries completely, the area by the hood latch can be bent over and screwed in place.


-
- As installed. The oil fill breather will be changed before the car is completed.

-
- Another look at the entire rear assembly.

-
- The rear bumper assembly ready to be installed.

-
- The steering wheel with a newly acquired horn button. Tested for fit and function.

-
- It looks more complete with every step.


-
- The front and rear windows are in and the quarter window rubber is cut to size.

-
- The rear quarter window assembly is complete. The latch knob will be restored.

-
- With the headliner, visors and mirror in place, this portion of the interior is complete.

-
- Another shot of the headliner. It turned out perfect.

-
- Here the dash pad and carpet kit are going in. Heater vents in the door sill area and speakers holes need to be done next.

-
- With the carpet done in back, the rear luggage platform is mocked up. The driver’s side seat bottom area will house a CD changer.

-
- At the same time, the fuel tank has been completed and installed. Starting the engine will be very soon.

-
- The doors and lids have been mounted and adjusted.

-
- Now the door windows can be installed.

-
- Here it is after the first test run.

-
- If you look closely, there is still only one seat in it. The interior can be finished when the material for the rear deck comes in.

-
- With the interior done it is ready to go.


-
- Clearly a unique shape.


-
- The rear deck houses the CD changer and provides a large area for luggage.

-
- This picture is the only one that really captures the color well.

-
- I think this one shows the subtle lines of it.

